Quick start guides
AI Blood Smear Analysis quick start guide (PDF)
AI Dermatology Diagnostics Quick Start Guide (PDF)
AI Equine Fecal Egg Count Analysis Quick Start Guide (PDF)
AI Fecal Analysis Quick Start Guide (PDF)
AI Urine Sediment Analysis Quick Start Guide (PDF)
Digital Cytology Quick Start Guide (PDF)
Users Guide
Vetscan Imagyst Overview
Settings and support
Technical Support
Technical Specifications
Signing In, Signing Out, and Session Security
Language Support
Session security
Navigation
Worklist
Vetscan Imagyst products
Inbox
Inbox: Lab View
Inbox: Clinic View
Inbox
Inbox: Add a New Cytology Test
Inbox: Add a New Blood Smear Test
Inbox: Add an Equine Fecal Test
Inbox: Add a New Dermatology Test
Inbox: Add-On Expert Review
Inbox: Cytology Test Order
Inbox: Fecal Sample Listing
Inbox: Scanning a Fecal Slide
Reviewing Digital Cytology results
Inbox: Reviewing Fecal Results
Inbox: Reviewing Equine Fecal Results
Inbox: Add an AI Urine Sediment Test
Inbox: Reviewing AI Urine Sediment Test Results
Inbox: Guide Drawer
Inbox: Reviewing Dermatology Results
Inbox: Scanning an AI Urine Sediment Test
Scanners 2.0
My Profile
My Profile
My Profile: Edit the User Profile
My Profile: Signature Block
My Profile: Roles and Permissions
Company Information
Admin
Workflow
Fecal Workflow Overview
Cytology Workflow Overview - Clinic
Equine Fecal Workflow Overview
AI Dermatology Workflow Overview
AI Urine Sediment workflow overview
Adding a test 2.0
Order Entry
Order Entry: Overview
Order Entry: Scanning a Cytology Slide
Order Entry: Scan Area Mask
Order Entry: Add-On Expert Review
Order Entry: Scanning a Dermatology Slide
Images View
Images View
Images View: Page Features
Images View: Classification Listings
Images View: Reviewing Classified Images
Images View: Multi Selection and the Actions Panel
Images View: Assessment Drawer
Images View: Reviewing Blood Smear Results
Details View
Slide View
Slide View
Slide View (Legacy)
Slide View: Page Features
Slide View: Classification Listings
Slide View: Image Capture
Slide View: Edit an Image Capture
Slide View: Add a Temporary FOV Box for AI Urine
Slide View: AI Urine Classification Listings
Reports
Grundium Ocus
Grundium: Overview
Grundium: Before You Start
Grundium: Additional Product and Safety Information
Grundium: Scanner Parts
Grundium: Scanner Connectors
Grundium: Locking and Unlocking the Slide Lock
Grundium: Keeping the Scanner Software Up To Date
Grundium: Power Button Status Light
Grundium: Turning the Grundium Scanner On and Off
Grundium: Moving the Grundium Scanner
Grundium: Cleaning the scanner
Grundium Scanner Software Update
Grundium: VETSCAN IMAGYST Scanner Statuses
Grundium Troubleshooting Guide
Grundium scanner packaging instructions
Fecal Sample and Slide Preparation Guide
Urine Sample and Slide Preparation Guide
Slide Template Help
My profile 2.0
Tips
Digital Cytology
Digital Cytology sample preparation
The basics (staining and submission) (PDF)
Blood smear (PDF)
Tissue cytology (fine needle biopsy/aspiration) (PDF)
Fluid - body cavity (pleural, peritoneal) (PDF)
Fluid - CSF (cerebrospinal fluid) (PDF)
Fluid - synovial/joint (PDF)
Fluid - body cavity (pericardial) (PDF)
Fluid - washes
Other sample types (PDF)
Digital Cytology improving your suspected lipoma cytology samples (PDF)
Slide template help
AI Urine Sediment
AI Urine Sediment medical whitepaper (PDF)
AI Urine Sediment hospital resource guide (PDF)
AI Urine Sediment Complete urine sediment analysis point of care (PDF)
Blood
AI Dermatology
Video Guides
Blood Smear How To
AI Blood Smear Analysis do's and don'ts
AI Blood Smear Analysis demonstration
How to: NMB Stain
AI Blood Smear Enhanced Workflow and Reporting
Digital Cytology How To
Digital Cytology Demo
How To: Coverslip and Immersion Oil
How To: Dos and Dont’s
How To: Using The IMAGYST Application
How To: Fine Needle Aspiration
How To: Fine Needle Biopsy
How To: Fecal Cytology
How To: Blood Smear
How To: Stain A Slide
How To: Ear Cytology
How To: Urine Sediment
How To: Skin Lesions / Scrapings
How To: Line Smear
AI Dermatology How To
AI Dermatology Demo
How to Skin Swab
How to Ear Swab
How to Submit Left and Right Ears Test
How to Impression Smear
Fecal How To
Fecal Check List
How to Run a Test
Step 1: Collect Fecal Matter
Step 2: Prepare Fecal Sample
Step 3: Add Sample to Slide
Step 4: Place Coverslip
Step 5: Initiate Test
Step 6: Load and Scan Slide
Step 7: Review Scan
Maintenance
AI Equine Fecal
Urine How To
Release Notes
- All Categories
- Users Guide
- Order Entry
- Order Entry: Scan Area Mask
Order Entry: Scan Area Mask
Updated
by Shannon Mitchell
When the scan-area mask suggested by the scanner is not acceptable, users may create a manual scan-area mask to better suit their needs.
What is a scan-area mask?
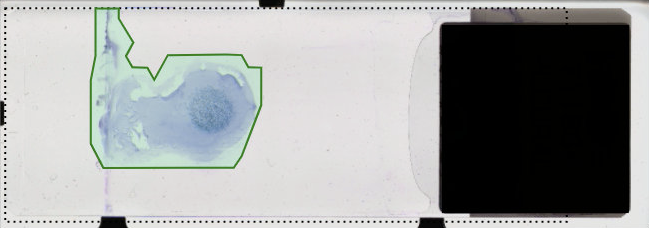
A scan-area mask is the highlighted area of a scan preview that indicates which areas of a slide will be scanned. In the scan preview below, the green area is the suggested scan-area mask.

Evaluating a Scan-area Mask
To evaluate a scan-area mask, consider:
- The type of sample on the slide (smear or splatter)
- The amount of sample that has been masked
- The estimated scan time
The most-important areas of a smear or splatter are very different. Therefore, the type of mask (size and shape) will also be different.
It is recommended that at least 50% of the sample on the slide is selected for scanning, including as many high-value areas as possible. White space should be avoided and a good margin should exist around areas of importance.
It is also recommended that an estimated scan time should be between 8-10 minutes; However, smaller sample sizes may result in shorter scan times, and larger sample sizes may result in longer scan times. The quality of the scan (size of the masked area) is always more important than the scan time.
If in a user’s opinion, the suggested scan-area mask is not sufficient, the user should use the scan-area mask tools to alter the mask.
Mask Patterns for Smears
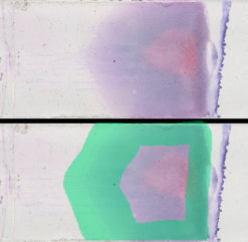
When users create a mask for a smear, they should include the feathered edge, monolayer, edges, and leading edge with ample margin in all areas. This creates a hollow arrow shape as demonstrated below.

Mask Patterns for Splatters
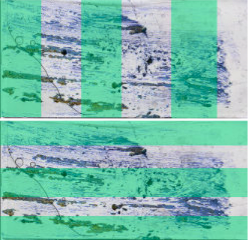
When users create a mask for a splatter, they should include at least 50% of the slide, using a horizontal or vertical striped pattern to cover areas of importance. Users should make sure to include areas that are both lighter and darker.

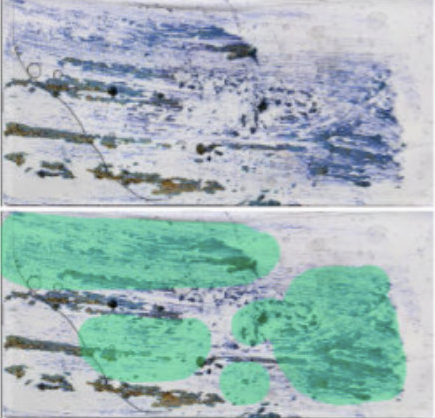
However, due to the random size and shape of splatters, stripes may not always be the best solution. What is important is to capture 50% or more of the slide, including lighter and darker areas. In some instances, simply drawing masks around more important areas of the slide will render the best scan.

Scan-area Mask Tools
Icon | Description |
Add Another Area ( | The pen tool is used to deselect selected masks or to create new masks. A maximum of 4 masks can be created on each slide. |
Delete ( | Click to delete a selected mask. |
Undo ( | Click to undo the last action. There is an unlimited number of undos. |
Reset Scan Areas ( | Click to reset the mask to the default scan-area mask. |
Creating and Editing masks
Once the scan preview appears, if the suggested scan-area mask is insufficient, users can use the scan-area mask tools to manually create up to 4 masks.
Selecting and Deselecting a Mask
To select a mask, click on the pen tool ( ) and then click on the mask. To deselect a selected mask, click on the pen icon.
Creating a New Mask (Click and Drag)
You can create a new mask by selecting the pen tool ( ) and clicking and dragging on the slide. You cannot create a mask that is larger than the scannable area of the slide (dotted lines).
Creating a New Mask (Click to Place Mask Points)
You can create a new mask by selecting the pen tool ( ) and then clicking multiple times to place multiple mask points. The mask points define the shape of the mask. You cannot place a mask point outside of the scannable area of the slide (dotted lines).
Adding a Mask Point
To add a mask point:
- Select a mask.
- Click anywhere outside of the mask.
- A new mask point is added.
Editing Mask Points
A mask point is a blue dot that defines the area of a scan-area mask. To move a mask point:
- Select a mask.
- Select a mask point by mousing over the point.
- Click and drag the mask point to the desired location.
Deleting a Mask Point
To delete a mask point:
- Select a mask.
- Mouseover a mask point. The mouse point should change to a finger.
- Click on the (X) key.
Deleting a Mask
To delete a mask:
- Select a mask.
- Click on the Delete tool (
 ).
).
Moving a Mask
To move a mask:
- Select the mask.
- Click in the center of the mask and hold down the mouse button.
- Drag the mask into its new position.
- Release the mouse button.
Overlapping Masks
Avoid overlapping masks. Overlapping masks unnecessarily increase the time to scan a slide. If two or more masks are overlapping, use the creation, editing, and deletion tools to update the scan-area masks.
Time To Scan
When considering how much material to capture, especially with slides that have a larger sample area, the recommended time is 8-10 minutes worth of scannable area. Of course, a smaller sample may result in much shorter scan times even when you have selected all the material on the slide.
Users should take into consideration the amount of material selected and the time to scan when the sample size is larger. To reduce scan times, consider eliminating white space and using the suggested mask patterns.
Estimated Time to Scan
The Estimated Scan Time is an estimate for how long it will take the scanner to scan the masked areas of a slide. When a user changes a mask, adds a mask, or deletes a mask, the estimated time changes.
If there is no mask, there is no Estimated Scan Time. If masks overlap, the time to scan takes into account both masks. A user should avoid having two or more masks overlap.

 )
) )
) )
) )
)